Monday, August 12, 2013

CO-OP Storage Shed - Part 4

With the recent addition of some more paint, I went ahead and added the final touches to the door hardware on the storage shed.  Using Flat Aluminium paint, I dripped the end of a fine brush into the cap for the jar, gathering up just a little paint.  I then dragged it over the door railing and door hangers/clips, giving it just a touch of metal appearance.

Before:

After:

Done:

Hobby Store Trip

As I had threatened, I went to the hobby store for some more supplies to add to my collection.


I purchased a bunch more paint: Model Master US Navy Blue, Wood, Medium Green. Polly Scale CNW Yellow, Dark Green, Railbox Yellow, Pullman Green, GN Big Sky Blue, Flat Aluminium (yes, that is how it is spelled on the jar) and Aged Concrete.

I also purchased a large quantity of sheet styrene (plain, v-groove, metal siding, board and batten, etc).  I purchased some quick dry gluing agent to help speed up glue curing times.  Lastly I purchased a hobby miter box for cutting wood and plastic.  It has a very fine tooth cutting blade. In all I spent about $117 on supplies, including tax.

Monday, August 5, 2013

CO-OP Storage Shed - Part 3

Another Month gone by, another project complete.  While I'm happy to have this project finished, posting every month really isn't likely to keep people coming back.  I'll try to do better.

As mentioned in the last update on the CO-OP Storage Shed, all that remained was to glue the walls together, painting, putting the roof on and weathering.

Using a 90-degree clamp, I butted the end together, to make nice square joints.  The clamp then holds the surfaces together while the glue sets.  I let the joints dry for 2 hours before releasing the clamp.  The model it self has raised edges inside to help align the walls.

Once two sets of opposite corners were glued together, putting the two sets together only required a flat surface to make the joints square.  There is some slight warping in the plastic that can be adjusted by gluing the top and bottom at different times.


I the slight bend in the styrene is okay and will be pushed square when the base is added later.  Here is a test fit of the base, just to make sure.


With the base inserted into the bottom, the bottom edge of the walls a squared up.  The upper part of the walls will square up when the roof is put into place.

With everything glued up (except the roof) and test fitted, it was time to paint and weather the CO-OP.  I again see this building as being in a downtown setting, seeing delivery trucks pulling up for their loads, getting a lot of use.  A picture before the paint and weather is applied.


I painted the base (retaining wall) section first.  Again this will be very dirty, but you need to be able to see the timbers making up the wall.  I mixed equal parts Polly Scale Earth and Polly Scale Mud and applied a light coat of paint it to the base.  Once dry, I added four large drops of Polly Scale Oily Black to the remaining paint mix as a highlight coat for the darker/worn areas on the timber.


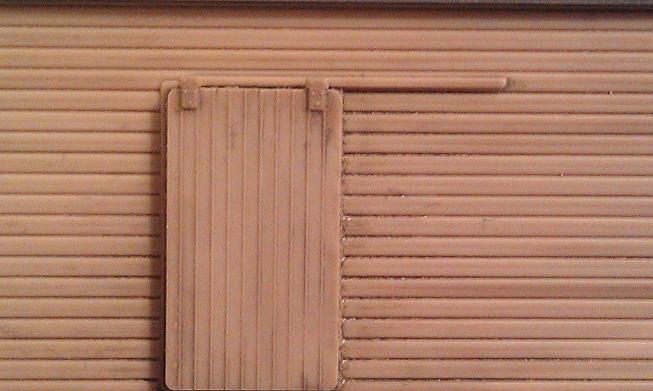
I then set the base aside to dry and started to work on the CO-OP walls.  The wood detail on the styrene is pretty nice and deep, so I didn't want to put a heavy coat of paint over it.  Though looking back maybe a worn out heavy coat would help show the buildings age.  I instead used a thinned Grimmy Black, to just age the base styrene color (tan).  I took the time to think about where the likely build up of grim and dirt would occur on the building during it's years in use.  I pretty happy with it's look.


Lastly, I painted the roof while the building dried.  The styrene is molded in a gray color, which is close to looking like metal roofing but is more flat than what I'm used to seeing.  Again, thinking the base color was close and usable, I used Tamiya Chrome Silver and dry brushed the roof with a wide brush.


I wanted to have areas that made the roof look worn and sun beaten.  I took the cap of the paint jar, and used what paint was at the top of cap as my paint source.  I then just dry brushed the paint in the same general direction as the roof lines.  The effect put a dull shine on the roof, where sun and rain water worn down the metallic metal shine.  Once the paint dried, I went back and did the same thing with some "rust" weathering powder.  I dry brushed very very little power from the lid of the container, just to highlight some imperfections in the styrene and roof vent area.

I applied the same technique to weather the roof vent, to be put on later, once the roof was glued together.

Not really much to show with gluing the roof together.  The kit has raised edges on the outer edges of the roof ends to help with placement and gluing.  Once both sides were aligned during a test fit, I placed glue on the top of each outside wall and placed both roof pieces in place.  With the glue dry, I turned the building over and used masking tape to help close any remaining gap between the joints of the roof.  I then glued the two together, sealing the joint closed.  I then removed the tape and attached the roof vent.


The final item was to glue the base/retaining wall to the CO-OP building.  Because I made the base to fit inside of the building, like the original kit base, it was a simple matter of slipping the building around the edges and gluing it in place.  The fit was go enough that I didn't even need to use glue to hold it in place, but I placed a small drop in each corner, just in case.

When I purchase some more paint down the road, I'll go back and touch up all the door pieces/rails, but until then here is the final product:


Thursday, July 4, 2013

CO-OP Storage Shed - Part 2

Well with the vacation and nice summer weather, it has taken me longer than I expected to get this far along in the project.

I initially planned to kitbash this pretty heavily, including adding a loading dock.  After looking some more at the way the structure walls and base are put together, I determined a dock would not be easy to accomplish.  I realized some minor modifications would produce a more realistic structure, appearing to have been upgraded for a busier and larger/more powerful trucks making delivers/pick-ups.

The first thing I did was trim off the first set of pillars around the CO-OP base.  I saved the cut pillars, not really sure why I did it at the time, just thought it would be a good idea.  I then used the base height as a cutting guide for the resin timber retaining wall I purchased while in Denver.  I cut the retaining wall a bit larger than need if adjustments needed to be made.  Yes, I forgot to take pictures of all this.

I then measured and cut the retaining wall to a rough length and glued a short and long side together.


Because the retaining wall isn't 100% straight, I glued the corner of one of the glued lengths to  the corner of the base.  I then bent the ends towards the corner, straightening out the retaining wall.  Timber retaining walls do move over time, so not having an perfect straight wall is okay.  Once bent into place, I glued the wall in place.


I then fit and trimmed the other length, gluing it into place to form a complete supporting wall around the edge of the structure base.  I used four (4) of the previously cut off posts (thankfully I saved them) to put a post in each of the four corners, hiding the seems and as I imagine in the prototype protecting the corners of the building from vehicle damage.


The base did not sit level and was a bit too tall (on purpose) once the retaining wall was glued into one piece.  Using a metal ruler as a guide I determined where the high and low spots were on the wall.  The interior posts also gave me the proper height I needed to achieve.

Placing a piece of medium grit sandpaper flat on my work desk, I took the base and sanded it for a few minutes, making sure to hit the high spots.  I stopped and checked for height and level every few minutes.  With about 10 minutes of sanding and measuring, I was able to have a nice level base at the correct height.


Next steps will include gluing the walls together, painting, putting the roof on and weathering.

Wednesday, June 5, 2013

Caboose Hobbies

During my trip to Denver I took a trip to one of the largest Model Train stores in the World, Caboose Hobbies.  I've been to a good number of hobby stores and I have to say this was the largest 100% dedicated to model trains I have been.  I would recommend a visit to anyone heading near the Denver Colorado area.  They have a large selection for all scales.  The brass department is amazing to see.  Everyone working at the store was extremely helpful and very knowledgeable.  It would be easy to spend hours there taking in all they have to offer.


While there I made a few purchases, including rolling stock and structure scratch/detail items:

Rolling Stock -
  1. InterMountain - 4750CuFt MNS 3-Bay Hopper
  2. Micro-Trains -  CNW 40' HyCube Box with Single Door
  3. BluFord Shops - CNW 70-ton 3-Bay Offset Side Hopper 
Structure Scratch/Details -
  1. Grandt Line - N Scale Grab Box Windows/Doors/Misc
  2. Fine N-Scale Products - Pole/Timber Retaining Wall
  3. Fine N-Scale Products - Concrete Block Walls
 

Denver Vacation - 2013

I recently took a four day vacation to the city of Denver.  The reason I went to Denver, say instead of Florida or some other more tropical location, is because it was cheap to get and stay there.  Having been to Colorado a few times previously, but never to the city of Denver, I thought why not give it a chance.

While there, among the many things that I did like taking in a Rockies baseball game and eating at some great restaurants, was to ride the Denver Light-rails or RTD (Regional Transportation District). Denver has 6 light-rail lines radiating out from the city.  I found understanding the payment system for the light-rails a bit confusing and not what I am use to.  It was also pretty pricy from what I have experienced with other light-rails/subways.  However, I could have just been doing something wrong.  Once your ticket is obtained for your trip, getting on your way it very easy and a comfortable ride.  I rode the both the D & H routes round trip, getting out along the way to take some pictures.

Thursday, May 30, 2013

CO-OP Storage Shed


The CO-OP Storage Shed was being sold at my local hobby store on clearance.  It is listed as being sold under the Walthers Cornerstone Series, but I believe it is produced by someone else and sold under the Walthers name.  Nothing wrong with that, just a bit of information, as you may be able to find this product from a different manufacture.


This is a very simple project.  There are very few parts for this structure.  In fact there are more "extra" parts for other structures sold by Walthers in the Cornerstone Series than there are used for this structure.  This will allow for me to add to my parts bin.

Here is a picture of all the parts within the package.


With the structures required parts removed from the spurs.  In fact the two tan side wall parts with the single window located in the lower right corner of the picture are not needed for the project.


Here are all the items for the parts bin.


Because the structure is so simple and there are so many extra parts, I think this would be a good candidate for some heavy kitbashing.  I am not 100% sure what I want to do to the building, but I will be adding a loading dock area to make it more functional in a city environment.  More details to follow as I plan some more bashing.

Tuesday, May 21, 2013

Modern Engine House - Weathering

I wanted the Modern Engine House to be a well used and weathered building.  The roofs of buildings rarely get any attention unless there is a leak or a roof vent has something within it.  And why bother really, only people in airplanes or hot-air balloons can see it.

 
To weather the building I used weathering powders and a few dry brushes.  The weathering powders I used were from A.I.M. Products. Never purchased anything from them other than these powders, but I am very happy with the results.  I would recommend their powders to others.


As their own website and included recommendation letter states, "These powders are quite intense so please put some paper under the model you are weathering to catch any excess and reduce chances of making any mess." so I took their warning.  It did not take much powder to create the effect I was looking for.  I also put a piece of paper under the building when weathering to reduce any mess and gather the excess powder.


I used three stiff brushes to apply the powder to the building.  One fine line artist brush, one narrow artist brush and one small foam brush.  I used the fine brush to apply spot specific rust powder to the roof vents and all metal items on the building (door trim, roll-up door housing, etc).  The narrow brush was used to spread the dark powders on the roof and common areas where exhaust/grease develop over time.  It was also used to spread the earth powder at the bottom edge of the building.


The foam brush I used to help blend and fade the powders all over.

Back to the powders from A.I.M., as reported they are intense and do not take much to get the wanted effect.  At the rate that I used these powders, they will last me another 50 years.  Testing the rust on a white sheet of paper I learned that dipping the brush into the powder put too much powder on the brush, even if I just put the end into the power.  Instead, I kept the lid on the powder container, held the lid top closed tight with my thumb, and shook the power until it placed a fine layer of dust onto the lid.  I then removed the lid and used the brush to gather up the fine dust layer within the lid.  Practicing the application process helped too.


I am happy with the weathering results.  This is basically the end of the road for the building.  Any suggestions or comments?  On to the next project.

Monday, May 13, 2013

Modern Engine House (60-001)

Modern Engine House.  My first project.  Below are some of the pictures I took while putting the building together.  Follow along as I have (almost) completed this project:


I thought this would be a good first project for me to help develop my skills.  It is modern and fairly simple, making it a good target for customization.  Opening the box to make sure all the parts were present, as there are only a few small parts, was easy.  All the small parts are in a small plastic bag to prevent them getting lost.


Following the instructions, I took out one of the building ends.  Seeing as I do not have a layout to put the building on when complete, I'm pretty free to customize it as I see fit.  Here is a picture before I took the hobby knife out.   Take note of the guide lines.


As the box picture suggests, I used the guide lines and a steel straight edge, to cut two openings into the building end, allowing two engines access into the building. 


I then added the roll-up door trim and roll-up door housings.  Gluing the trim is not easy.  This was the most difficult part of putting the building together.  The directions say, "there are two steps in the trim with one having a slightly longer leg."  It took me awhile to figure out what that meant, but basically once figured out gluing and holding it in place while the glue dried was tricky.  Putting to much pressure on the trim causes it to move out of place.  I ended up using a small piece of cardboard bent to the correct width.

Here is a diagram of the trim.  When it says "slight" it is very slight.  This is not to scale, but about 10000x bigger than real life.  It's very "slight" but important you install the longer leg in the correct position.

Also, I did not paint building walls before installing the trim and roll-up door housings.  I should have.  Trying to paint around them after being installed was more difficult than it should have been.


Wanting to make the building a little bit different than normal, I only cut out one of the rear roll-up doors out from the plastic.  I imagine the one side of the building being closed and used as repair area/paint section, while the other allows for maintenance on engines as they pass through.


The next task was to install the man doors into the building.  This is made easy as two ribs in the wall, once cut out, are the same width as the man door.  Some minor sanding allows for the door to go right in.


Here is the final location of the man doors on my engine house.


Looking to modify the modern engine house to make it my own, I used some scrap styrene to create a few slight features to the building.  The upper wall section below, I mounted a square styrene piece cut to fit and a round flat plastic piece, making a large housing for a vent.

In the lower wall section, I cut a piece of styrene spur free and it had a rounded end, so I mounted it flush to the "ground" and square to the wall.  I image this being a storage tank or other misc building item.


Below are pictures of walls and trim painted.  I wanted to give the building some age and wear, so I brush painted on a base coat of tan, after having washed and let dry the parts.  Once the base coat was dry I applied a coat of Imperial light blue paint over all but the trim, door housing and man doors.  I cleaned up the over paint with a wet paper towel.


I next finished painting the trim and glued the structure together, making sure all the corners were square.  Having the corners not square once glued, would have made installing the roof near impossible.

Here is a picture of one of the pieces before trimming the flash and sanding the joint.  The flash here was surprising think, but this could be on purpose, because the sanding of the joint can take some work to get correct.  Better to have too much material then not enough.


 Here is a picture with the roof fit into place.


Here is the other side of the building.  I have also installed the metal roof vents.


Prior to installing the roof vents, I brush painted the roof reefer white.  The styrene was already a off-white color, so I did not put on a base coat.  I dry brushed on the reefer white, making sure to cover the entire surface, but not worrying about any thin or excess paint.  I imagine the roof does not receive much attention from building maintenance, so thin spots would be likely.

Weathering is to come next.


Finally, being my first N Scale Project, I thought it would be a good idea to complete the entire project before posting anything.  Now that I'm all but done, I think I was wrong.  Next time I'll post as I go along.  Weathering the building is up next.